Weekly Programming Challenge #16
Back in week #6 we tackled the Perlin Noise function and made some nifty effects. It shouldn’t be a surprise to learn that there are other ways to accomplish a similar thing, and this week we’ll be looking at one of them: the Midpoint Displacement Algorithm.
But first, let’s review week #15…
Week #15 Recap
For the 15th weekly programming challenge, we implemented a turtle graphics system.
Our participants for week #15 were:
- Martin Moberg, with an implementation in ClojureScript that nailed normal mode, as well as four hard mode conditions: colors, line styles, line widths, and an interactive interface. That’s five points! Check out his code here: https://github.com/indifferen7/weekly-challenges/tree/master/turtle, and his demo here: http://casualsemantics.se/turtle/.
- Jeff Erlandsson, who wrote his submission in Elm and got normal mode, plus the following hard mode conditions: color, line width, push/pop, and scaling, for a total of five points! His code is here: https://github.com/erljef/weekly-challenges/tree/master/week-15, with an online (but not interactive) demo here: https://erljef.github.io/weekly-challenges/week-15/.
Great work! My own submission is in Ruby, here: https://github.com/jamis/weekly-challenges/tree/master/015-turtle-graphics. It implements normal mode, as well as colors and push/pop, for a total of three points.
Great work, everyone. Let’s see what week #16 brings!
Weekly Challenge #16
The midpoint displacement algorithm generates a fractal by recursively moving the midpoint of some space. It’s easiest to explain in two dimensions (on a line).
- Start with a line between two points on the x-axis.
- Find the midpoint.
- Offset it some distance along the y-axis.
- Repeat (recursively) for the line segments to the left and right of the midpoint.
- Continue until the distance between the points is smaller than the size of pixel, and you’re done.
Visually, it looks like this:

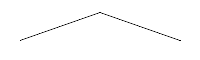

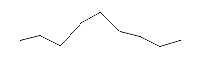
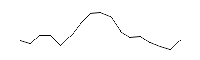
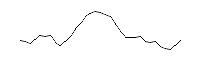
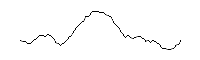
In practice, you’ll start with some maximum distance that the point may be offset, and that maximum will decrease at each step. The above image started with a maximum offset of 50 pixels, which decreased by half at each step (25 pixels at step 2, 12.5 pixels at step 3, etc.).
Normal Mode
For normal mode (and one point), mutate a 2D line using the midpoint displacement algorithm, as described above. Your program should:
- Accept an argument specifying the maximum initial offset to use when displacing the midpoint.
- Accept an argument specifying how quickly the offset should “fall off”, defaulting to 0.5. (Each step will multiply the maximum offset by this fall-off value to determine the maximum offset for the next step.)
- Produce an image of the resulting line.
That’s it!
Hard Mode
For hard mode, be prepared to stretch yourself! Each of the following will give you one additional point:
- Modify your program to accept a list of points, describing line segments to initialize the algorithm with. In this way, you can begin with a rough outline of the shape of the final line. For an extra point, allow each initial line segment to specify it’s own normal direction (instead of assuming the y-axis), along which midpoints ought to be displaced. This will let you displace the boundaries of polygons, like triangles and hexagons!
- What happens if you displace the midpoint perpendicular to the current line segment, instead of simply displacing along the y-axis? Give it a try!
- Instead of a simple straight line, see if you can displace the boundary of a circle! Your program should accept the radius of the circle, in addition to the other two arguments.
- Implement the algorithm a second way. For example, if your first attempt was depth-first, try making it breadth-first instead, and vice-versa.
- Store the shape of the line at each intermediate step, and render them all, allowing you to see how the line evolves (kind of like the sequence of images above). This can be accomplished in various ways, but note that a depth-first implementation of the algorithm might make this option tricky!
- The midpoint displacement algorithm can be extended to three dimensions. The Diamond-Square algorithm is one such adaptation. Implement the Diamond-Square algorithm and draw the resulting 3D surface. (You may use an external program to render the surface if you want, like POV-Ray.) It may be easiest to render the surface as a 2D image, using shades of gray to indicate the height of each point. (You earn three points for tackling this option!)
Feel free to shoot for “surprise me” mode, too! It doesn’t have to be any harder than normal mode, but it ought to implement the challenge (either normal mode or hard mode) in some surprising, clever, or otherwise delightful way. See what you can come up with!
This challenge will run until Saturday, November 19th, at 12:00pm MST (19:00 UTC).
The deadline for this challenge has passed, but feel free to try your hand at it anyway! Go ahead and submit a link to your solution in the comments, anytime. For a full list of the last 16 challenges, see the Weekly Programming Challenges Recap.
