Implementing a Bloom Effect with Swift+Metal
I’ve been learning a lot about Apple’s Metal framework recently, as I’ve been working through building a game based on navigating mazes on non-planar surfaces (cylinders, mobius strips, etc.). It’s been a lot of fun, but it’s also been pretty frustrating. Metal is still pretty new, so it can be a challenge to find answers when you get stuck. You typically wind up translating from OpenGL to Metal…which can be tricky if you’ve never actually learned OpenGL.
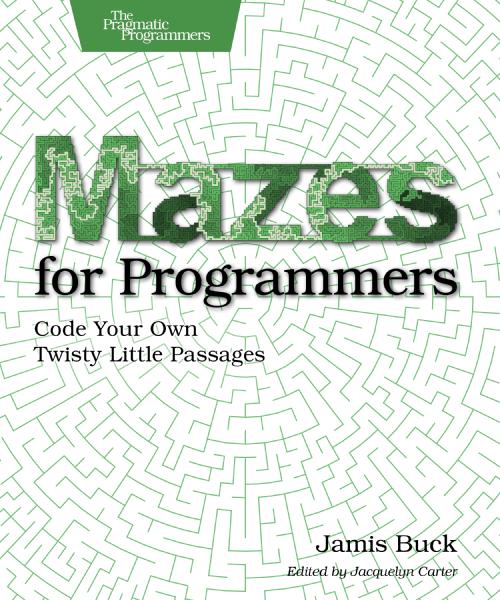
Recently, I wanted to implement a bloom or glow effect, like the following image:
The white square is slightly in front of the rainbow square, and has a bloom effect applied to it, making it seem to glow slightly.
Of course, there were plenty of resources describing how to do it in OpenGL, but nothing in Metal, and the vocabulary used by Metal and OpenGL don’t always overlap. After much trial and error, I managed to get it to work, and it works pretty well. Today I’m going to describe how I did it, for two reasons:
- Maybe this will help others in the same boat I was. Sometimes all you need is a few code examples and a word or two describing how to use the API in a specific instance.
- Because I had to figure this out myself, I may very well be doing some things wrong. If you’re an experienced Metal dev, please (please!) point out if you see me doing anything wrong, or if I could be doing something better.
Note that this is not a complete tutorial; I’m not going to show you how to set up Metal, or prepare buffers or textures, or any of that. There are some really great tutorials on those points elsewhere. I’m going to assume that you already have some experience with Metal, and instead I’m going to focus on these points:
- Using color attachments to configure multiple frame buffers.
- Writing to multiple frame buffers in a single fragment shader.
- Using Metal Performance Shaders to apply a Gaussian blur to a texture.
- Using a compute shader to composite two textures.
It is no coincidence that these points correspond to the different steps of creating a bloom effect:
- Render the scene, drawing bright objects to both the primary and secondary frame buffers.
- Blur the secondary frame buffer.
- Combine the blurred buffer with the full scene, making those bright objects appear to “bloom”.
So. Here we go.
Configure the Metal Layer
The Metal layer is the bit that actually displays what we’re rendering. Most tutorials will recommend setting the layer’s framebufferOnly attribute to true, for performance reasons, but if you’re going to be doing post-processing on the frame buffer, you have to set it to false. The good news is that performance wasn’t significantly impacted (for my use case). Your mileage may vary, of course.
metalLayer = CAMetalLayer()
metalLayer.device = device
metalLayer.pixelFormat = .BGRA8Unorm
metalLayer.framebufferOnly = false // <-- THIS
metalLayer.frame = view.layer.frame
Multiple Color Attachments, Multiple Frame Buffers
This wasn’t clear to me at first, but each color attachment that you configure corresponds to a frame buffer (or “texture” in Metal parlance).
The color attachments must be configured in two places. First, on the render pipeline descriptor that you use to prepare the render pipeline state:
let library = device.newDefaultLibrary()!
let vertexProgram = library.newFunctionWithName("vertexShader")
let fragmentProgram = library.newFunctionWithName("fragmentShader")

let descriptor = MTLRenderPipelineDescriptor()
descriptor.vertexFunction = vertexProgram
descriptor.fragmentFunction = fragmentProgram

descriptor.colorAttachments[0].pixelFormat = .BGRA8Unorm
descriptor.colorAttachments[1].pixelFormat = .BGRA8Unorm

do {
  pipelineState =
    try device.newRenderPipelineStateWithDescriptor(descriptor)
} catch let error as NSError {
  pipelineState = nil
  print("could not prepare render pipeline state \(error)")
}
Note the two color attachments on the pipeline descriptor. We set the pixel format on them, because those are the two we’ll use for our framebuffers. The pixel format must match the pixel format of the Metal layer.
Once those have been configured on the pipeline state, you also need to set up the color attachments on the render pass descriptor. (I’m assuming you’ve already prepared a separate texture that matches the dimensions and pixel format of the layer itself.)
let drawable = metalLayer.nextDrawable()!

let black = MTLClearColor(red: 0.0, green: 0.0,
  blue: 0.0, alpha: 1.0)

let descriptor = MTLRenderPassDescriptor()
descriptor.colorAttachments[0].texture = drawable.texture
descriptor.colorAttachments[0].loadAction = .Clear
descriptor.colorAttachments[0].clearColor = black
descriptor.colorAttachments[0].storeAction = .Store

// `maskTexture` is a texture you must set up beforehand
descriptor.colorAttachments[1].texture = maskTexture
descriptor.colorAttachments[1].loadAction = .Clear
descriptor.colorAttachments[1].clearColor = black
descriptor.colorAttachments[1].storeAction = .Store
That’s all it takes to set up multiple frame buffers. Next, we’ll look at how to write to those frame buffers from a single fragment shader.
Writing to Multiple Frame Buffers
The key to writing to multiple frame buffers, is telling the shader which attributes of the fragment output correspond to which color attachments. You do this with the color(n) annotation. Below is the relevant bit of a simple fragment shader that just passes the color straight through. VertexOut is the output of the vertex shader, and the mask property is used to indicate whether the fragment should be “bloomed” or not (that is, whether it should be written to the mask texture or not).
struct VertexOut {
  float4 position [[ position ]];
  float4 color;
  uint   mask;
};

struct FragmentOut {
  float4 color0 [[ color(0) ]];
  float4 color1 [[ color(1) ]];
};

fragment FragmentOut fragmentShader(
  VertexOut in [[ stage_in ]])
{
  FragmentOut out;
  float4 black(0.0, 0.0, 0.0, 1.0);

  out.color0 = in.color;
  out.color1 = in.mask ? in.color : black;

  return out;
}
The significant parts are the two attributes of the FragmentOut struct, where color0 is associated with color(0) (the first color attachment), and color1 is associated with color(1) (the second color attachment). Whatever values we write to those in the fragment shader will be written through to the appropriate position of the corresponding textures (frame buffers).
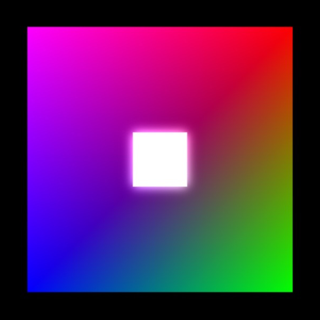
The fragment shader then writes the vertex color to the first frame buffer, and writes either the vertex color, or black to the second frame buffer (depending on whether the mask property is true or not.
The result is that our primary image might look like this:
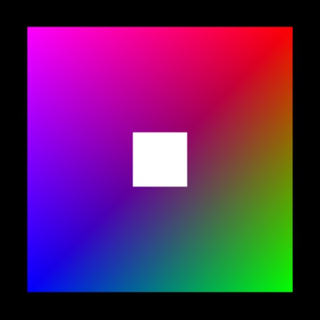
And our mask image contains just the white square in the middle:
Next, let’s blur that white square a bit.
Applying a Gaussian Blur
Apple’s “Metal Performance Shaders” framework includes implementations of several different convolutions, including a Gaussian blur. Metal makes it really easy to chain multiple effects together in a single command queue, so we can do our render, and then apply the blur to that masking texture.
// ... configure and draw to the renderEncoder ...
renderEncoder.endEncoding()

let kernel = MPSImageGaussianBlur(device: device,
  sigma: 5.0)

// not the safest way, but it works for brevity's sake
var texture: MTLTexture? = maskTexture
kernel.encodeToCommandBuffer(commandBuffer,
  inPlaceTexture: &texture, fallbackCopyAllocator: nil)
The result:

All that’s left is to composite that newly-blurred texture onto our primary frame buffer…
Compute Shaders for Compositing
There may be a better way to do this (I kind of expected Metal Performance Shaders to include a way to do composition, but it doesn’t…), but here’s how I made it work. I set up a compute shader that runs over the textures in parallel, computes the new value of each pixel, writes it to the output texture.
The shader itself takes three textures as arguments: the primary texture, the “overlay” texture that will be added to it, and the output texture (which, in this case, will be the same as the primary texture).
The gid parameter represents the position within the texture that we’re writing to. Each compute shader is configured to work over a 1-, 2-, or 3-dimensional grid, with threads running in “thread groups”. I’m, um, not going to explain all of that (since, I’ll admit, I’m not super confident in my own understanding of it all).
My compute shader looks like this:
kernel void computeShader(
  texture2d<float, access::read> source [[ texture(0) ]],
  texture2d<float, access::read> mask [[ texture(1) ]],
  texture2d<float, access::write> dest [[ texture(2) ]],
  uint2 gid [[ thread_position_in_grid ]])
{
  float4 source_color = source.read(gid);
  float4 mask_color = mask.read(gid);
  float4 result_color = source_color + mask_color;

  dest.write(result_color, gid);
}
To take advantage of this, we need to create a compute pipeline state that wraps the shader function:
let computeProgram = library.newFunctionWithName("computeShader")!

do {
  computePipelineState = try
    device.newComputePipelineStateWithFunction(computeProgram)
} catch {
  computePipelineState = nil
  print("could not prepare compute pipeline state")
}
Then, while setting up the render itself, we’ll queue up a compute command just after the Gaussian blur kernel:
let compute = commandBuffer.computeCommandEncoder()
compute.setComputePipelineState(computePipelineState)
// input one -- primary texture
compute.setTexture(drawable.texture, atIndex: 0)
// input two -- mask texture
compute.setTexture(maskTexture, atIndex: 1)
// output texture
compute.setTexture(drawable.texture, atIndex: 2)

let viewWidth = Int(view.bounds.size.width)
let viewHeight = Int(view.bounds.size.height)

// set up an 8x8 group of threads
let threadGroupSize = MTLSize(width: 8, height: 8, depth: 1)

// define the number of such groups needed to process the textures
let numGroups = MTLSize(
  width: viewWidth/threadGroupSize.width+1,
  height: viewHeight/threadGroupSize.height+1,
  depth: 1)

compute.dispatchThreadgroups(numGroups,
  threadsPerThreadgroup: threadGroupSize)

compute.endEncoding()
And then we wrap it all up by presenting the drawable, and commiting the command buffer:
commandBuffer.presentDrawable(drawable)
commandBuffer.commit()
And that’s it! The resulting image has the white square glowing neatly in the middle:
Conclusion
It’s really not that hard to do, once you understand the concepts involved:
- The layer’s
framebufferOnlymust be false if you want to do post-processing on the displayed texture. - Color attachments are used to configure frame buffers. The “texture” for a given color attachment is the backing for the frame buffer.
- Fragment shaders use
color(n)annotations to describe which color attachment (and texture) to use for a given property. - Encoders are used to queue commands in sequence onto a command buffer, letting you perform multiple different kinds of commands in a given order.
- Metal Performance Shaders is a cool framework. :) It makes it very easy to set up pre-defined compute kernels to operate on a texture.
- Using a custom compute shader to process a texture lets you take advantage of the GPU and a high degree of parallelism to perform those computations.
Go forth, and bloom!
