Game Demonstration: Recover the Widgets
I love a good technical challenge, and I definitely set myself an excellent one a few weeks ago. Back in November I wrote Representing a Toroidal Grid, and I suggested that an article discussing how to generate actual geometry for the maze (real walls, etc.) would be interesting.
So I set to work!
Today I’m excited to show you how far I’ve gotten. It’s become an actual, functional (if simple) game, where you have to navigate a maze on a torus and recover 16 lost “widgets”.
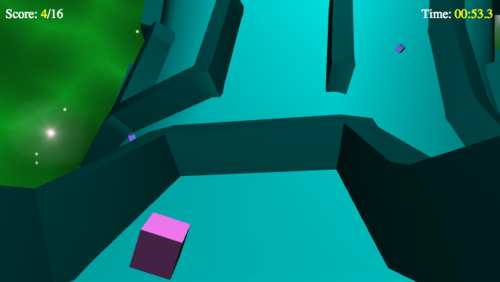
The widgets are randomly scattered around the innermost edge of the torus, and may require you to do some tricky navigation to recover them all as fast as you can!
The game is currently written in JavaScript, rendering with WebGL (via the excellent–if enormous–THREE.js library).
Go ahead and give it a try, if you like, but:
- Please remember it’s still a work in progress, and there’s a lot of work left to do on it, and
- It may or may not render on mobile devices (I haven’t tried it), but unless you have a keyboard attached, the game won’t be playable (yet).
If that doesn’t scare you off: Recover the Widgets!.
Rather than go over the code line-by-line (because it’s still very much subject to change, and much of the code is far from optimal), I’d like to point out a few lessons I’ve learned from this. They’re not in any particular order, and they’re mostly technical tidbits about THREE.js and toroidal geometry, but there are some philosophical points reflecting my own professional journey in here, too.
1. JavaScript + THREE.js as rapid prototyping environment
When I first started considering this project, I wasn’t sure what environment to write it in. I’ve never done anything significant in 3D graphics, and the lay of the land is pretty bewildering. Being able to present the finished product in a browser was a compelling point for me, though, and I’ve been super impressed by how well THREE.js worked for this. (There is a ton of optimizing I have yet to, which will make it work even better.)
I’d like to try porting this to iOS, though… Eventually.
2. The importance of “near” and “far” planes
This was the root of a bug that took me far too long to troubleshoot, because I wasn’t familiar with the concept of “near” and “far” planes. Basically, these are conceptual planes that indicate the bounds of what will be visible. Anything nearer than the “near” plane will be invisible, and anything farther than the “far” plane will be invisible.
You configure these in THREE.js when you set up the camera:
var fov = 60;
var aspect = width / height;
var near = 0.1;
var far = 1000;

camera = new THREE.PerspectiveCamera(fov, aspect, near, far);
Make sure anything you want to see falls between those two planes!
Also, make sure your geometry is large enough that the near plane becomes a non-issue! My original prototypes rendered the entire thing on a torus with a major radius of 1. This meant that I was dealing (for the most part) with distances that were tiny fractions of a unit, and I was running into that near plane constantly. I’ve since scaled the torus up by a factor of 10 (but I should probably go even further).
3. Field of View
The THREE.js sample code I used to start experimenting (yay! a rotating cube!) used a field of view of 75 degrees. I continued using that for a while, but eventually found the slight fish-eye effect a bit disorienting. I went down to 45 degrees for a few iterations, but that turned out to be too constraining. The current game uses a 60 degree FOV. I openly acknowledge that choice of FOV seems to be in the realm of “personal preference,” though; maybe eventually the game will let you configure that.
4. UV-Mapping a Torus
The easiest way to assign 2D coordinates to every point on a torus is to use the theta (θ) and phi (φ) angles. Theta describes the “toroidal” angle (relative to the origin of the torus), and Phi describes the “poloidal” angle (relative to the center of the ring):
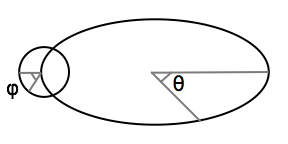
From those two angles, you can compute the world (x,y,z) coordinates for any position on the torus.
// This treats the inner equator as phi==0

var r = major - minor * Math.cos(phi);
var x = r * Math.cos(theta);
var y = -minor * Math.sin(phi);
var z = r * Math.sin(theta);
And since I relied on those two angles to help describe the grid (see Representing a Toroidal Grid), I was able to use them to compute the positions of every cell and wall.
5. Computing the normal vector
Once you know a position on a torus, you also need to know the vector that points perpendicularly away from the surface (the normal). This normal vector is the direction that (for instance) walls will stick out from the torus. To compute the normal vector, you compute the toroidal tangent vector (the vector pointing in the toroidal direction from the current point) and the poloidal tangent vector (the vector pointing in the poloidal direction). The normal vector, then, is the cross-product of those two vectors.
// toroidal tangent
toroidal = new THREE.Vector3(Math.sin(theta), 0, -Math.cos(theta));

// poloidal tangent
poloidal = new THREE.Vector3(
  Math.cos(theta) * Math.sin(phi),
  -Math.cos(phi),
  Math.sin(theta) * Math.sin(phi));

normal = new THREE.Vector3();
normal.crossVectors(toroidal, poloidal).normalize();
But hang onto those toroidal and poloidal tangents, too, because…
6. Computing direction on a vector is relative to toroidal/poloidal tangents
I’m serious. Assume the angle you’re facing is relative to either the toroidal or poloidal tangents. (I chose the poloidal tangent, because it made more sense to me to think of facing toward the center.) You take that tangent vector and rotate it around the normal however many degrees your camera is turned. (Fortunately, THREE.js has helper functions for all this stuff.)
facing = new THREE.Vector3().copy(poloidal);
facing.applyAxisAngle(normal, angle);

target = new THREE.Vector().copy(camera.position);
target.add(facing);

camera.up = normal;
camera.lookAt(target);
camera.updateProjectionMatrix();
7. Put the light behind and above the camera
I originally had two light sources, one above the torus and one below. The problem there was that the edges of the torus were pretty dark. I tried putting the light at the camera position, but because of how the material shading worked it resulted in surfaces appearing very dark when viewed close by. The solution (and what the current demo uses) is a light that follows the camera two units behind, and two units above (relative to the camera’s “up” and “facing” vectors).
8. Collision testing with raycasting
Want to know if you’ve run into something? Create a ray and cast it into the scene from the camera position. If it intersects something, and that intersection is within some minimum distance, then you’ve run into something.
Using this naively worked okay, but it allowed me to approach surfaces obliquely and get closer to them than I wanted. To compensate for that, I cast two rays–one in the toroidal direction, and one in the poloidal direction. It works pretty well, but I need to do more work on this. If you approach the obtuse corner of a wall, you can walk right through it. (Oops!)
9. Wall construction is trickier than it seems
My first attempts at building walls were pretty naive. I just had each cell build a wall to the north and the west, and while it worked, it was kind of ugly.
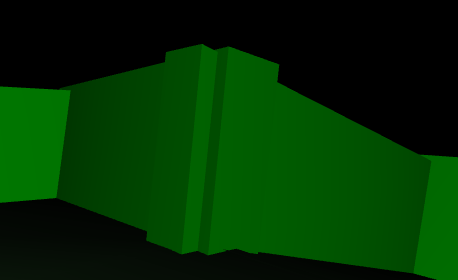
The walls overlapped each other and just generally looked spikey and off-putting. I made this better in the current version by treating the intersection points as special cases and building those “cap” areas separately from the actual walls themselves. I think it looks cleaner:
Once I’ve optimized things a bit more, I’d like to see about making the walls even better by subdividing them along their length and generating multiple different segments. This will let them look more round, like the surface they’re approximating.
10. Overlaying text
This only works with WebGL, but it works well: just overlay divs on top of your canvas to put text (like scores, and timers) on top of your game display. I put the canvas inside a container div with “position: relative” and “display: inline-block”, and then added some divs as siblings of the canvas element with “position: absolute” to position them where I needed them. It works a treat!
Summary
I’m really having a blast with this project. I can’t wait to optimize it a bit and adding some more features… Stay tuned!
And if this is interesting you, you should check out my book, Mazes for Programmers! It doesn’t cover 3D programming, but it’ll boggle your mind with all the maze-related techniques it crams into 250 pages.
